Hướng dẫn tạo module trong magento 2
Module là gì?
Module trong Magento 2 (hay còn gọi là một extension) là một phần mở rộng có nhiệm vụ tạo ra một (hoặc một tổ hợp chức năng liên quan) cần thiết cho website. Ví dụ chức năng cms, chức năng quản lý hàng tồn kho,… Có hàng trăm module khác nhau trên một website magento 2.
Hướng dẫn này sẽ giúp bạn tạo mới một module trong magento 2

Tạo module trong magento 2
Đầu tiên các bạn tạo thư mục chứa module, với đường dẫn
app/code/Vendor/Modulename
Vendor có thể là tên công ty, hay tên team còn modulename là tên module của bạn
Ở hướng dẫn này mình sẽ tạo một module với vendor là Hoaingo, tên module là Helloworld
Tạo file registration.php
Tiếp theo các bạn tạo cho mình file registration.php trong thư mục của module với nội dung như sau:
<?php
/**
 * Copyright © HoaiNgo Blog. All rights reserved.
 */

\Magento\Framework\Component\ComponentRegistrar::register(
    \Magento\Framework\Component\ComponentRegistrar::MODULE,
    'Hoaingo_Helloworld',
    __DIR__
);
Tạo file module.xml
Tiếp theo bạn tạo cho mình file module.xml nằm trong thư mục etc có nội dung như sau:
<?xml version="1.0"?>
<!--
/**
 * Copyright © HoaiNgo Blog. All rights reserved.
 */
-->
<config xmlns:xsi="http://www.w3.org/2001/XMLSchema-instance" xsi:noNamespaceSchemaLocation="urn:magento:framework:Module/etc/module.xsd">
    <module name="Hoaingo_Helloworld" setup_version="1.0.0">
        <sequence>
            <module name="Magento_Cms"/>
        </sequence>
    </module>
</config>
Trong đoạn các đoạn code trên Hoaingo chính là tên thư mục vendor của mình, còn Helloword là thư mục con trong đó cũng chính là tên module mà chúng ta tạo.
Ở file module.xml:
Thuộc tính setup_version dùng để khai báo phiên bản của module.
Thẻ sequence là nơi bạn khai báo các phụ thuộc được load trước của module này, trong ví dụ của mình module Hoaingo_Helloworld sẽ được tải sau module Magento_Cms, điều này hữu ích khi bạn muốn override một chức năng của một module nào đó và bạn muốn module của mình được tải sau nó. Nếu module của bạn không có phụ thuộc nào, thì bạn loại bỏ thẻ này.
Kích hoạt module
Bạn chạy lệnh sau:
bin/magento setup:upgrade
Sau khi chạy lệnh này, hệ thống sẽ kích hoạt module của bạn, đồng thời tạo ra trong file app/etc/config.php một dòng như sau:
'Hoaingo_Helloword' => 1,
Kiểm tra trong database, bảng setup_module, chúng ta sẽ thấy như sau:

Vậy là chúng ta đã khai báo xong một module trong magento 2 rồi. Dĩ nhiên đây là module chưa có bất kỳ chức năng nào cả.
Tạo Controller
Tiếp theo chúng ta sẽ tạo các file cần thiết để in ra màn hình dòng chữ “Hello world” nhé.
Khai báo routes.xml
Bạn tạo file routes.xml nằm trong thư mục frontend/etc có nội dung sau:
<?xml version="1.0"?>
<!--
/**
 * Copyright © HoaiNgo Blog. All rights reserved.
 */
-->
<config xmlns:xsi="http://www.w3.org/2001/XMLSchema-instance" xsi:noNamespaceSchemaLocation="urn:magento:framework:App/etc/routes.xsd">
  <router id="standard">
    <route id="helloworld" frontName="hello">
      <module name="Hoaingo_Helloworld" />
    </route>
  </router>
</config>
Bạn lưu ý rằng, vì chúng ta tạo controller để hiển thị ở frontend nên sẽ nằm trong thư mục etc/frontend. Còn nếu bạn muốn cho admin (back office) thì bạn sẽ tạo file này trong thư mục etc/adminhtml
router id khái báo loại router, frontend sẽ có các loại sau: robots, urlrewrite, standard, cms, default . Mình sẽ có một bài nói kỹ hơn về routing trong magento 2 nên ở đây mình không đi sâu.
route id là định danh route của bạn, id này sẽ được dùng khi đặt tên file layout, frontName là alias hiển thị
Khai báo layout
Tạo file layout nằm trong thư mục view/frontend/layout/{fileName}.xml với {fileName} là tên file được đặt theo định dạng sau routeid_controller_action, trong ví dụ của mình sẽ là helloworld_index_hello (Index là tên thư mục controller viết thường, hello là tên file action viết thường)
<?xml version="1.0"?>
<!--
/**
 * Copyright © HoaiNgo Blog. All rights reserved.
 */
-->
<page xmlns:xsi="http://www.w3.org/2001/XMLSchema-instance" layout="1column" xsi:noNamespaceSchemaLocation="urn:magento:framework:View/Layout/etc/page_configuration.xsd">
  <referenceContainer name="content">
    <block class="Magento\Framework\View\Element\Template" name="hoaingo_helloworld_hello_main_block" cacheable="true" template="Hoaingo_Helloworld::hello/main-block.phtml" />
  </referenceContainer>
</page>
Tạo controller
Tạo file Hello.php nằm trong thư mục Controller/Index
<?php

namespace Hoaingo\Helloworld\Controller\Index;

use Magento\Framework\App\Action\Context;

class Hello extends \Magento\Framework\App\Action\Action
{

    protected $pageFactory;

    public function __construct(
        Context $context,
        \Magento\Framework\View\Result\PageFactory $pageFactory
    ) {
        $this->pageFactory = $pageFactory;
        parent::__construct($context);
    }

    /**
     * @inheritDoc
     */
    public function execute()
    {
        return $this->pageFactory->create();
    }
}
Tạo template
Cuối cùng chúng ta sẽ tạo template trong thư mục view/frontend/templates để hiển thị ra màn hình, bạn tạo file theo đúng đường dẫn được khai báo trong thuộc tính template (nằm trong file layout) nha, của mình sẽ là hello/main-block.phtml, đường dẫn được tính từ thư mục templates, cứ vào một thư mục thì thêm một dấu slash “/”
<?php
/**
 * Copyright © HoaiNgo Blog. All rights reserved.
 */

/**
 * @var $block \Magento\Framework\View\Element\Template
 */
?>

<h1>Hello world!</h1>
<h2>Welcome to HoaiNgo Blog</h2>
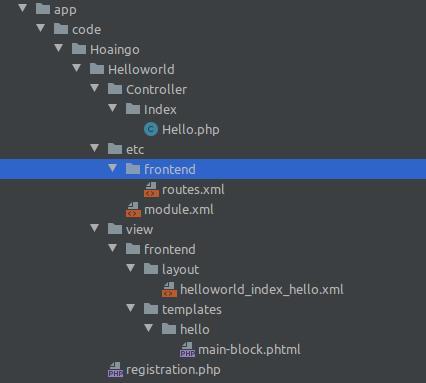
Cuối cùng thư mục module của chúng ta sẽ như thế này
app/
┣ code/
┃ ┣ Hoaingo/
┃ ┃ ┗ Helloworld/
┃ ┃   ┣ Controller/
┃ ┃ ┃ ┃ ┗ Index/
┃ ┃ ┃ ┃   ┗ Hello.php
┃ ┃   ┣ etc/
┃ ┃ ┃ ┃ ┣ frontend/
┃ ┃ ┃ ┃ ┃ ┗ routes.xml
┃ ┃ ┃ ┃ ┗ module.xml
┃ ┃   ┣ view/
┃ ┃ ┃ ┃ ┗ frontend/
┃ ┃ ┃ ┃   ┣ layout/
┃ ┃ ┃ ┃ ┃ ┃ ┗ helloworld_index_hello.xml
┃ ┃ ┃ ┃   ┗ templates/
┃ ┃ ┃ ┃ ┃   ┗ hello/
┃ ┃ ┃ ┃ ┃ ┃   ┗ main-block.phtml
┃ ┃   ┗ registration.php
Các bạn chạy lệnh sau để flush cache:
bin/magento c:f
Cuối cùng, truy cập đường dẫn http://yoursite/hello/index/hello chúng ta có kết quả như sau:

Tổng kết
Vậy là mình đã hướng dẫn các bạn một cách chi tiết nhất và những thứ cần lưu ý khi tạo mới một module trong Magento 2. Các bạn có thể xem thêm nhiều bài viết khác về Magento 2 tại đây
Chúc các bạn thành công.
